Professional wedding planning tips + trends + what to do + especially what not to do

Professional wedding planning tips + trends + what to do + especially what not to do

Thursday, December 31, 2015

So you're engaged. . .5 things you need to do right now

Congratulations!  You're engaged!  First of all, enjoy it!  Once you're ready to get started planning, here are the first steps:

1.  BUDGET.  If you have an unlimited budget, congratulations.  But most folks don't have that luxury.  You'll want to sit down and pencil out how much you comfortably want to spend, and how much family is giving you (if they are giving you something).  You don't have to know a headcount, and you don't have to know what things cost.  The most important thing is to come up with a budget that is comfortable to you.  No wedding should put you in debt.  EVER.  The average wedding in Montana, for an average number of guests is usually about $250 per person (to help you with your budgeting if you have no idea where to start!)

2.  PINTEREST.  We love Pinterest.  Like A-LOT.  We suggest you get on there and start pinning designs and ideas that exemplify your wedding style and what you think you want.  Type into the notes what you like about each image.  That helps your vendors understand your style.  But beware - we suggest pinning only in the first few months.  If you stay on there, and continue to pin, you'll snowball into adding more and more ideas to your wedding, costing you money.  Use the pinning as a communication tool with your vendors.  That's when it's most effective.

3.  GUEST LIST.  Come up with a rough list. . . but don't tell anyone who is on the list!  Sit down with your fiance, and each family, and get separate lists of guests they would like to invite.  Go through all your lists, and THEN decide who you want to invite.  Once you decide how many people you can accommodate, per your budget, you are ok to verbally tell people they'll be receiving an invitation.  But until then, tell your family to keep it under wraps!  A large guest count is the #1 reason for blowing through a budget, and it's easier to just not invite people than it is to go back and tell them they're un-invited!  

4.  HIRE A PLANNER.  Contrary to popular planner policy, I don't change my price based on what people have to spend.  I'm a flat rate, based on the size & scope of your wedding.  That means, I'm able to work with a variety of budgets.  So don't be afraid if your budget is teeny, or if it's huge! You CAN afford a planner no matter what!  And the rumors are true - I end up saving my clients money, which typically more than makes up my fee.  I just love to work with folks who know how many people they'll have, and what they want to spend.  It makes my job easy!  I step in and help finish up the designs, based on your pinterest board, and what your budget is.  And after that, we can start figuring out which vendors are best to accomplish the job for the right price.

5.  BOOK YOUR VENUE.  This is the biggest mistake I still see clients making.  Only AFTER you've done numbers 1-4 are you ready to book your venue.  We've had lots of clients who do this step first, because they're afraid to lose the space.  It never fails.  They always end up booking a venue that eats up a huge chunk of their budget.  If you don't do this for a living, you don't understand just how much money is needed for all other aspects of the wedding too.  Although your reception is typically 40% - 50% of your budget, the venue is only about 20% of that.  So we recommend taking a few days to figure out 1-4, and then take care of this step.

Money is often a senstivite subject in any relationship, whether you have very little or even if you have a lot.  My method of planning makes you talk about the not-so-fun activities right away (such as budget and guest list) to help relieve the stress that money can cause.  Entering into a marriage without debt is always my goal, and I've been very successful using this method.  I hope you find it helpful as well!

Every wedding has a budget.

Wednesday, July 8, 2015

Products we love! The Confetti send off

I’ve been thinking a lot lately of things a bride can do in lieu of sparklers (since we’re heavy into fire season already).  Grand exits are SO MUCH FUN, and I realized there’s a product out there that I LOVE that I’ve never promoted before!  Check out www.flutterfetti.com.  These are color-customizable confetti sticks!  They’re are easily stored and distributed to your guests, and are pretty idiot-proof.  I’ve used them for many years at New Year’s Eve Celebrations and they’re always a hit!  They’re only a few bucks per stick, and they would leave a lasting impression on any event!  I highly recommend them (they’re also the same company that supplies the confetti for Times Square on NYE, so you can trust they know what they’re doing!)

Flutter fetti confetti sticks in use!

HOW TO: Plan your wedding ceremony program

If you’re getting married in a church, the priest or minister or “church lady” are going to help you form the elements of your wedding ceremony.  This blog is meant for those brides who are having a non-denominational ceremony and really have to build it all themselves.  The easiest way is to think of this whole ceremony as a 20-30 minute script you’re writing.  It’s a choreographed theatrical event.  If you have a Justice of the Peace or hired Officiant run your ceremony, ask them which parts they typically cover.  You can usually incorporate more elements into the ceremony upon request, so don’t be afraid to ask!  Or if you’re having a friend marry you, this is a good list to begin building your ceremony with:

PRE-CEREMONY:  You’ll want music playing as guests arrive to the venue.  Silence is no Bueno!

SEATING GUESTS:  Typically, guests aren’t seated until shortly before the ceremony begins.  Ushers are VERY helpful in reserving seats, and ensuring the front rows of your ceremony are filled.

PROCESSIONAL (WEDDING MARCH):  This takes practice (do this at the rehearsal), but you need to decide how everyone will get to the front of the aisle.  This part is typically slower, controlled, peaceful.  Beautiful, emotional music is great, or even something with personally important lyrics.  This is the order:
  • Officiant at the front of the ceremony, escorting the groom and best man, walk in from the side
  • Mother & Father of the groom
  • Mother of the Bride
  • Bridesmaids (and Groomsmen, if escorting the bridesmaids, otherwise the groomsmen can walk in with the groom)
  • Ring Bearer & Flower Girl
  • Bride & Father of the Bride


BLESSING (GIVE AWAY):  Practice this at the rehearsal too.  The Father of the Bride (or whomever is “giving the bride away” should greet the groom, then literally hand her off to the groom.  This signifies you’re leaving her in good hands and you’re giving you approval!  The officiant will ask who gives the bride away, and the appropriate answer is “her mother and I.”

CONVOCATION (WELCOME):   This is explaining why we’re here today!  Just a quick welcome.

INVOCATION (OPENING BLESSING):  A short blessing of the wedding day.

SERMON (ADDRESS):  Often a story, or some words about the couple.  If you’re not going to do this element, this is a great place to substitute some custom elements, like:  Readings, Poems, Stories, Music performances, or custom elements (wine ceremony, sand ceremony, candle lighting)

CONSECRATION (DEDICATION BLESSING):  This is another small blessing following the sermon, to reiterate the words that were just spoken, and to bless the union.

DECLARATION OF INTENT:  Legally required!  The “I do” part of the ceremony.

VOWS:  You can find the standard vows online, or you can write your own!  Have your maid of honor or best man hold these for you – you have enough to remember on your wedding day, and getting put on the spot without your vows could be really stressful!

RING BLESSING:  Explains the purpose of exchanging rings

EXCHANGING OF THE RINGS:  The physical exchanging of the rings and the “repeat after me” part of the ceremony.

PRONOUNCEMENT OF MARRIAGE:  Legally required also!  This is the “I now pronounce you man and wife” section of the ceremony.

THE KISS:  Doesn’t need a definition, but it should be discussed on how you’re going to do this part!  Practice so you’re not awkward and caught off guard, because this moment WILL be photographed!

BENEDICTION (CLOSING PRAYER):  This prayer sends off the new couple into their future with one another.

PRESENTATION:  The part where they say, "I'd like to introduce Mr. and Mrs. _______”

RECESSIONAL:  This is the order in which everyone leaves the ceremony.  This is the beginning of the celebration!  Upbeat, fun, exciting!  Frequently, bridesmaids are paired with groomsmen, and follow the bride & groom down the aisle.  Ushers would then help escort guests row by row, starting with the front  row and moving down the aisle, alternating sides.


COCKTAIL HOUR:  We always suggest some sort of a break between the ceremony and the reception, so you can get family pictures together!  If you’re doing a cocktail hour, make sure to inform your officiant, so he can announce where all the guests are to go!  The officiant typically does this after the wedding party has exited the ceremony. 

Thursday, June 11, 2015

So, I'm the maid of honor. . .what am I supposed to do now?

The Maid or Matron of honor has a LOT of duties leading up to the wedding day.  Below are the main priorities (note if Events by Autumn is hired for full service coordination, we will manage the items in pink!)
  • Lead the bridesmaids. It's the maid/matron of honor's (MOH) job to direct the other maids through their duties. Make sure everyone gets their bridesmaid dresses, go to dress fittings, and find the right jewelry.
  • Ensure the bridal party is informed about all pre-wedding parties
  • Help shop for dresses (the bride's and the bridesmaids'). And the MOH pays for her own entire wedding outfit (including shoes)
  • Offer to help the bride with pre-wedding tasks:  addressing invites, assembling wedding favors & programs, etc.
  • Offer to help the bride in selecting a venue, dress, menu, etc.  Give an unbiased, honest opinion – you don’t have to love any of it, but the bride should appreciate you pointing out that an ice cream cake isn’t great for an outdoor wedding, or the heavy, 100lb. beaded dress might get really hot on a July night.  If she still decides to go for it, SUPPORT HER
  • Be knowledgeable about the wedding day plans, so you can be the planners “emergency” contact, instead of the bride
  • Spread the news about where the bride and groom are registered, and even help the bride shop for registry items, if she invites you
  • Help the bride change for her honeymoon and take charge of her gown after the ceremony, by arranging for storage in a safe place until she returns
  • Lend an ear. Whether it's about the planning, the marriage, or the registry china patterns, the MOH should assure the bride that she has someone with whom she can share her thoughts. Even if she seems to dwell on the same subjects repeatedly, the MOH keeps listening
  • Host or cohost AND attend a bridal shower for the bride
  • Attend all pre-wedding parties
  • Keep a record of all the gifts received at various parties and showers (or delegate a bridesmaid to handle this)
  • Plan and attend the bachelorette party with the bridesmaids.
  • See to it that all bridesmaids get to the rehearsal; coordinate transportation and lodging, if necessary
  • Be prepared to help out at the rehearsal dinner where needed.  Volunteer to take duties off the families’ plates
  • If you couldn’t drop off décor in advance, or if the bride forgot something, it’s the MOH’s job to get those décor items to the ceremony or reception venue the morning of (whether you do it yourself, or delegate)
  • Make sure that all bridesmaids get their hair and makeup done
  • Keep an eye on the bridal party while getting ready - a little champagne is good, but make sure everyone is also getting plenty of water too
  • Make sure there is breakfast AND snacks available all morning for the bridal party.  Something healthy which is also easy on the stomach, to jump-start a big day
  • Help the bride get dressed.  Make sure you take an inventory of everything you’ll need BEFORE you get on site:  dress, undergarments, jewelry, veil, shoes, etc. (see the checklist below)
  • Be at the bride’s beck and call!  Be there to answer her phone, grab her lipstick, or just calm her nerves
  • Ensure bridal party gets to the ceremony on time
  • Make sure everyone has the correct bouquets
  • If the bride wants some privacy before the ceremony, make sure she gets it
  • Hold the groom's ring during the ceremony. Safest place to put it?  On your thumb
  • Arrange the bride's train and veil before the ceremony begins and just after she arrives at the altar
  • Hold the bride's bouquet while the couple exchanges vows
  • Sign the marriage license as a witness, along with the best man
  • Bustle the bride’s train for easy dancing at the reception
  • Stand next to the groom in the receiving line (this is optional; the bride may decide to have attendants circulate among the guests instead)
  • Be a gatekeeper.  Was someone invited whom the bride doesn’t get along with very much, but still had to invite?  Help out by politely “rescuing” her from that conversation if she gets trapped
  • Play hostess along with the other bridesmaids at frequent points during the reception: show guests where to sit, direct them to restrooms, tell them to where to put presents, invite them to sign the guest book, etc.
  • Clean the bridal suite.  ESPECIALLY if the bridesmaids used it to get ready in.  Don’t let the bride & groom return to a disaster.  It’s the MOH’s job to clean this room up after the bridesmaids are done in there
  • Collect any gift envelopes brought to the reception and keep them in a safe place
  • Make sure the bride takes a moment to eat something -- refresh her drink, get her a plate of food from the buffet table, or instruct the wait staff to keep her entree warm
  • Dance with the best man during the formal first-dance sequence and possibly be announced with him at the beginning of the party.  Lead the dancing all night (get people on the dance floor!)
  • Toast the couple after the best man.  And makes sure you jot down notes and don’t wing it. . .
  • If the dollar dance is performed, you’re in charge of locking up the money
  • Decorate the getaway vehicle (IF the bride wants you to!)
  • Purchase a bottle of champagne and some late night snacks and have them delivered to the bridal suite for when the wedding is over and the bride & groom finally get to retreat for the night!
  • Troubleshoot emotional crises. In most cases, this will require lots of tissues, hugging, and hair-smoothing. The MOH continues to be a trusted friend, a good listener, and a smart advisor
  • Keep the bride laughing. For the stressed-out bride, laughter can be as effective as venting 


The Maid of Honor Checklist

These are all items that typically a Maid of Honor would be responsible for on the day of the wedding.  That doesn’t mean she needs to buy all these items, but she DOES need to make sure the bride brings them with her, and they’re readily available!

Please note, Events by Autumn brings a “bridal emergency kit” to all weddings, which is stocked with over 300 miscellaneous items, including many of the things listed below.  The bride will want to bring her own items for getting ready, but just know if something is missing when she arrives on site, most likely, Autumn has it in her kit! 
  • Your Bridesmaid Dress
  • Bride’s Wedding Dress
  • Bobby Pins
  • Make-up
  • Make Up for Touch-Ups
  • Clear Nail Polish
  • Nail Glue
  • Hairspray
  • Tissue
  • Perfume
  • Jewelry for the Bride and yourself
  • Wedding Dress shoes and a casual pair for after
  • Undergarments for the wedding dress
  • Needle, thread (white and color of bridesmaid dresses), and scissors
  • Contact solution/rewetting drops or glasses
  • Breath Mints
  • Pantyhose/Nylons (at least 2 pair)
  • Change of clothing for after
  • Phone numbers of all the important vendors
  • Watch
  • Any prescription medication the bride or groom is on
  • Plane tickets and luggage if the newlyweds are going on their honeymoon straight from the wedding
  • Flowers (unless brought by the vendor)
  • Extra money (just in case of emergency)
  • A friend to stand by for back up in case the car has flat tire or engine problems
  • Your speech
  • Card to give the bride (always a cute friend idea)
  • 2 garters (1 to keep and 1 to toss)
  • Grooms Ring
  • Tylenol and Tums
  • Deodorant / Antiperspirant
  • Phone Numbers of all Important Family Members in the Wedding, Bridesmaids, Grooms
  • Toothbrush
  • Antacid
  • Cash (In small bills for tips)
  • Umbrellas - in case it rains or if it is too hot
  • Q-Tips for touch-ups
  • Toothpicks/Dental Floss
  • Small Face Mirror
The maid of honor and the bridesmaids she's responsible for.  Photo courtesy of CakeKnife Photography,

Thursday, June 4, 2015

HOW TO: Change your last name after you're married

Step 1: Make a Copy of Your Marriage License
You’re going to need this to show proof that you’ve gotten married in order to change your last name.


Step 2: Social Security Card
The first step is to change your name on your social security card, which will help you in changing your name on everything else. Visit the Social Security Administration’s website and fill out an application for a name change. (Read more HERE).  You will use your marriage license in combination with the application to prove that you have gotten married.  


Step 3: Drivers Licenses & IDs
Once you receive your new social security card, you can take it (along with your marriage license) to the Department of Motor Vehicles and get your name formally changed on your driver’s license or your ID.


Step 4: Finances
You’re going to want to visit your bank pretty quickly after you receive that new identification with your new name. Your name must match on your ID and your bank accounts in order to access your money, so take your new ID or driver’s license, your new social security card and your marriage license to your bank. Ask them about the process of changing your name on your accounts and get that taken care of.


Step 5: Changing Your Name Everywhere Else
After following the first few steps, you will have all the new identification proof you need to change your name everywhere else.  Here's another list of everywhere else you may want to update your name:
  • Place of Employment
  • Local Post Office
  • Credit Card Companies
  • Utility Companies:  Cable, Phone, Internet, Gas, Water, Electric
  • Doctors Offices:  Primary Care, Dentist, Optometrist, Veterinarian, etc.
  • Insurance Providers:  Health, Vehicle, Home, Life, etc.
  • Schools:  Your alma mater & any kids' schools as well
  • Publication subscriptions:  magazines, newsletters, etc.
  • Anyone who would bill you for services (professional services)


It’s that easy – although the process usually takes a few weeks, you can get started on it early by filling out an application through the Social Security Administration before you leave for your honeymoon.

Thursday, May 28, 2015

Who pays for what at a wedding? And how to budget that money

The first question I ask my full service or design clients is “what is your wedding budget?”  And more often than not, I get a blank stare, or an “I have no idea.”  I’m not asking to be nosey; I’m asking so I can pair you with the right vendor for your budget (and style, of course!)    A wedding should not put you in debt.  I work with all types of budgets, so I’m not going to turn you away if you’re “not spending enough.”  I just need to make sure what I’m suggesting is within your means.

I frequently feel that “budget” is treated as this dirty word, which no one wants to talk about.  But we NEED to talk about it.  Setting a budget and sticking to it is a healthy way to plan – going into debt by blowing your budget out of the water is stressful and potentially damaging to relationships.  

Bottom line is, you MUST have a budget conversation with your family, so you know who is taking responsibility for which aspects.  Then you can know 100% what your wedding budget will be.

There are very traditional roles of how families spend their money at a wedding.  I’ll list these roles below, but note that nothing is set in stone!  In this day and age, some brides & grooms are paying for their weddings on their own.  Sometimes the groom’s family helps out a lot more than traditions state.  It’s all individualized.  But this list is meant to help you ask the right questions, so you can budget for your wedding effectively.

Helpful Hint when dealing with “gift” money from family – build in a buffer so you don’t have to ask for more money.  10% is a great estimate to cover unforeseen expenses.  So if your family says they’ll give you $40,000 and that’s the ENTIRE AMOUNT you have for your wedding (let’s say you can’t afford another cent), you’ll want to set your wedding budget at about $36,000, so if you see something that you MUST HAVE, you can go over your budget slightly, and your buffer will cover it.
  
BRIDE and FAMILY: 
  • Invitations, announcements, and wedding programs
  • Church or synagogue fees
  • Bride's dress, veil, accessories, and trousseau (read: lingerie and honeymoon clothes)
  • Floral arrangements for church (including huppah if a Jewish wedding ceremony) and reception
  • Bouquets and corsages for bridesmaids and flower girls
  • All wedding photos and video
  • All professional services, including food, drink, rentals, decorations, and music at the ceremony and reception
  • Wedding planner/coordinator
  • Wedding transportation of bridal party to and from ceremony and reception
  • Accommodations for all bridesmaids
  • If there is more than one engagement party, bride's family hosts the first one


GROOM and FAMILY:
  • Marriage license
  • Officiant's fee and travel and accommodations if necessary
  • Groom's outfit
  • Bride's bouquet and going-away corsage, boutonnieres for men, and corsages for mothers and grandmothers
  • Plan and host the rehearsal dinner
  • The entire honeymoon
  • If there is only one engagement party, typically this expense is split between bride & groom’s families
  • Accommodations for all groomsmen and groom’s family
  • Transportation for the groom's family and groomsmen


BRIDE ONLY:
  • Plan and host bridesmaids' luncheon
  • Groom’s ring (sometimes with help from her family)
  • Bride's gifts to her bridesmaid and groom


GROOM ONLY:
  • Plan and host bachelor’s dinner
  • Bride's rings (sometimes with help from his family)
  • Gift for groomsmen
  • Attire for groomsmen (only if he wants to)
  • Gift to the bride


MAID OF HONOR & BRIDESMAIDS:
  • Plan and host shower
  • Their own attire (including shoes)
  • Gift for the couple (multiple gifts if attending the shower and wedding)


BEST MAN, GROOMSMEN & USHERS:
  • Plan and host bachelor party
  • Their own attire (including shoes)
  • Gift for the couple


FRIENDS:

  • Additional engagement parties or showers
Photo courtesy of Cake Knife Photography:   www.cakeknifephotography.com

Thursday, May 21, 2015

What is wedding gift etiquette?

How do you know how much to spend on a wedding gift?  Is there really an etiquette to it?  We liked this article, so why re-invent the wheel!  You can read the original article HERE.


By Mitch Lipka  (The author is a Reuters contributor. The opinions expressed are his own.)

(Reuters) - When you go to as many weddings as Stephanie Wong does, you need to come up with some guidelines for gift-giving. During the past two years, Wong, 32, who works in marketing for a book publisher in San Francisco, has been to about a half-dozen weddings. She expects to attend three more this year.

The amount Wong spends is all about her relationship to the people getting married, how fancy the wedding is going to be and whether she brings a date.

At a recent wedding of a close friend where she did a reading and went alone, Wong gave the couple $300. At another wedding in her social circle, she skipped the reception and gave $75.

As the wedding season gets into full swing, guests from coast to coast are confronted with the same question: How much should you spend and how should you give it?


THE ETIQUETTE
Wedding experts agree on a couple of things: the closer you are to the bride or groom, the more you are expected to give, and do not give more than you can afford just because of the expectations.

Defying the "cost-of-the-meal" school of gift-giving, where guests give a gift roughly equivalent to what it cost to host them, Kristen Maxwell Cooper, deputy editor of the wedding-focused website TheKnot.com, says location and cost of the reception should not be the burden of the guest.

She offers these guidelines to wedding-goers wherever they might be: A distant relative or co-worker should give $75-$100; a friend or relative, $100-$125; a closer relative, up to $150.

If you are wealthy, are you expected to inflate the gift? No, Cooper says. "If they do, it's because they're just generous people."

Meghan Ely, who has been in the wedding industry for a dozen years, says it is reasonable to give on the lower end if you had to spend a lot to get there.

And, she and Cooper agree, buying items off a registry, where there is one, is a good idea.

"These days, couples are statistically older and more established in their lives so when they register, they are truly asking for things that they need," Ely says. "It really takes the guesswork out of it for the guests."

That's about how it worked out for Melinda Parrish, a 30-year-old model from Washington, D.C. who got married last year in Annapolis, Maryland. Her guests spent an average of $115 off her registry, and most of her friends gave $50-$100. Some who had financial obstacles made gifts or framed photos. One made a charitable donation in their name.

Most of all, she was surprised that about 40 of the 200 guests who attended gave nothing.


ALTERNATIVE REGISTRIES
Some experts note a trend of couples registering for various elements of their honeymoon, including a night at a hotel, a dinner or an evening of drinks.

It's a request that runs afoul of some, including Peggy Newfield, founder of the American School of Protocol in Atlanta, who recently attended a wedding where the bride and groom solicited unusual presents. "You could check whether you wanted your gift to cover champagne on the plane or in their suite at the hotel, their limo service, dinner in the evening, or whatever," she says.

Her way of responding to the request: "We sent just a congratulation card. There is no etiquette today that defines how crass our society has become."

Cash has even taken a more modern twist - you can send a monetary gift with your credit card. Websites like Tendr.com facilitate the process (for a 5 percent cut of each gift).

The 4,000 gifts given in Tendr's just-completed first year in business averaged $125 nationwide, the company says. Connecticut wedding-goers were the most generous, with an average cash gift of $230.


(Editing by Lauren Young, Beth Pinsker and Andrew Hay)

Thursday, May 7, 2015

HOW TO: Make plastic wine barrels look like wood

You know you're in the right line of work when you still love what you do AFTER hours too!  I love crafting, and I do a bunch of crafting for my weddings.  But I also love working in my yard!  So I combined the two together for this springtime project.

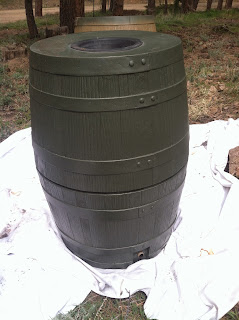
These are rain barrels I purchased at Murdoch's ranching supply, and they were an ugly green color, but the plastic is imprinted with woodgrain texture, so I saw potential.  I started off with the following colors of MATTE FINISH (that's important) spray paint:  Nutmeg, Warm Caramel, Fossil, Espresso & Dark Walnut.  Then I also purchased a can of GLOSS FINISH black spray paint and oil rubbed bronze paint as well, in a quart sized can.  Anything that's supposed to look like wood should be with a matte finish paint, and the gloss & oil rubbed bronze is used on the metal looking parts.  I prefer the 2x coverage rustoleum paint, because it's thick, and it seems to adhere to plastic really well.

The paint colors needed to create the final product Stage one of the project - plastic, unpainted rain barrels
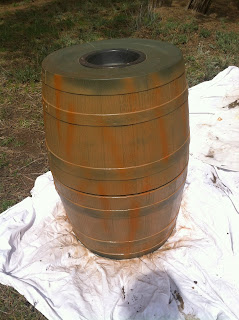
Step 1:  Take the nutmeg paint and paint the wood grain in that color.  You want to hide the green plastic with this step.  Don't worry about covering the "metal" parts of the barrel until step 7!

Paint with nutmeg spraypaintStep 2:  Add vertical stripes of the warm caramel paint.  Don't worry about making them straight - just be spontaneous! 
Paint stripes with caramel paint
Step 3:  Repeat the step above with the fossil colored paint.  Be a bit more liberal with your fossil colored stripes - these highlights give the wood a more natural look.
  

Spray lines with fossil paint

Step 4:  Now add stripes in Espresso!  Liberal coverage here is very good.  And I tended to concentrate it a bit towards the top and bottom .


Spray barrels with espresso paint

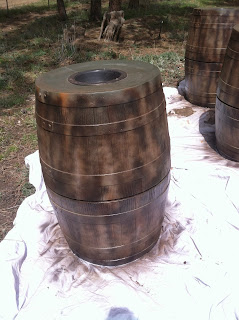
Step 5:  Now it's time to use the dark walnut paint and make it look like wood.  Take your time on this step.  All the other steps were really just quick coverage.  I went back over it a few times, and made sure the stripes of paint from previous steps were visually broken up.   This dark walnut color will be the main concentration of color on the barrel, so be generous with your coverage, but allowing those underlying paint colors to peek through.

Spray barrels with dark walnut paint

Step 7:  My favorite step!  Paint the tops with the black gloss spray paint, and use a smaller brush to add the "metal" ring details with the oil rubbed bronze paint.


Add the ring details using black gloss spray paint and oil rubbed bronze paint.Step 8:  Place the barrel in your yard to start collecting water!  There's no reason to have those ugly rain barrels in your yard when you can buy these for the same price and paint them to look really rustic!  I finished 3 barrels with the paints I pictured above.  The finished rain barrels in placeHappy crafting, everyone!


Thursday, April 30, 2015

Custom wedding invitations

Putting together that perfect combination of details is what really makes your wedding special to you.  A large part of that customization comes from details like food & beverage, décor, and entertainment.  But there is a large element you shouldn’t overlook because it can have a big impact AND it doesn’t cost a lot.  And that’s customizing simple things like: save the dates, invitations, RSVP cards, table numbers, escort cards, place cards, menus, thank you cards, and more!  

Autumn has created a branch of her business known as “Happy Huckleberry Studios” where she specializes in graphic design for customized wedding invites.  Combining her creative background with her artistic ability, she’s able to customize the design, and also add those special elements that make your designs one of a kind!  Not finding exactly what you want online?  We can make it for you!  From adding fabric, ribbons, custom die cuts, letterpress printing, metallic print. . . you name it, we can do it.

There’s two options for booking us to do your custom designs:
  • Fill out an inquiry form HERE, and email it to: Happyhuckleberrystudios@gmail.com to get a custom price quote for your invitation suite!
  • Or book Events by Autumn for a DESIGN or FULL SERVICE PLANNING package – where the labor to design and assemble invitations is FREE!  You’re only responsible for the cost of the paper products, materials, and printing.  It ends up saving you a bunch of money in the long run, AND gives you that customized feel you were going for!
Here are some images from this week’s designs (these are just designs, and aren't printed on the custom paper just yet!):
Customized invitation suite created by Happy Huckleberry Studios

Created by Happy Huckleberry Studios

Created and customized by Happy Huckleberry Studios


Thursday, April 16, 2015

Why do I need a wedding day rain plan? And what should it consist of?

I can't help it.  I'm a little bit superstitious when it comes to weddings.  I love incorporating the something borrowed, something blue, something old, something new.  I also believe that getting married on the half hour is lucky.  But there is one thing I'm INCREDIBLY superstitious about when it comes to outdoor weddings.  And that is MAKING A RAIN PLAN.

Why would I need to make a rain plan, you might ask?  Well, here are two reasons:

1.  Avoid the rainy day meltdown.  Trust me!  I've seen hundreds of weddings, and all brides are a bag of emotions on their wedding day.  Set yourself up for success by planning in advance.  Just sit down a few months before the wedding and discuss your rain plan with your planner.  You want to check off the list that you know 100% what the plan is, and your planner does too.  The peace of mind from being prepared is a HUGE step in avoiding a wedding day meltdown.  

2.  Because I believe in Murphy's Law, if you don't make a contingency plan, the likelihood of rain will increase by 85% (Ok, so I made that percentage up, but I promise if you don't plan for it, it WILL rain).  Just plan ahead, and communicate your plan.


What should my rain plan consist of?
Think of it this way:  You're the bride.  You're off in your ready room, and it starts to pour rain on your guests waiting for you to walk down the aisle.  How you manage this situation if you're not the one giving direction?  Here's my rain plan list:
  • If you're planning an outdoor reception, RENT A TENT.  It is just as useful for shade from the heat as it is against foul weather.  Just do it.  I know it's a big expense, but it's critical.  At times, I even consider refusing to work weddings that don't have some shade for their guests.  It may look cool spread out on the open lawn, but in the middle of summer at 6pm, it's kinda miserable in the sun.  Think about your guests!!!
  • Where will the ceremony take place when it rains?  Often I make the contingency plan to just sit at the reception tables, and host the ceremony on the open dance floor, so all can see.  But this is completely up to you.
  • Who will direct the traffic?  Depending on what time you make the "rain call," either myself or my assistant will direct the guests to the proper location.  If you wait too long, and are about ready to walk down the aisle when you decide to move the ceremony, my assistant will guide the guests, and I will stay with you.  You need someone with authority and a loud voice to jump in and give guidance to people who are getting rained on.  Moving wedding guests in a rain storm is like herding cats.  I've done it before.  Too many times.
  • Therefore, my next tip is to set a deadline for making the weather call.  Look at the forecast.  Be smart about it.  I typically try to make a rain call for an evening ceremony by 2pm.  That gives time to move chairs and be prepared before the first guests arrive.  As I mentioned above, I've had weather calls made by the bride AS she's walking down the aisle, and it makes for a lot of confusion when guests scramble to get into the reception tent.  It's better to just make a call early and stick with it.
  • Protect rental items.  You will find that some rental companies have strict guidelines on not getting certain items wet.  Your planner will know about this, and you will too (you did read your contract, right?!)  But if you didn't hire a planner, you'll want ushers/friends/family to know what items need to be taken out of the rain immediately.
  • Bring a nice umbrella.  If you're going to have to get from point A to point B, and there's any chance of rain, buy a nice umbrella.  Chances are, you'll be photographed under it. . .You want something that goes with your theme/color scheme!
  • LOVE your contingency plan.  OWN it.  Don't be disappointed if the weather doesn't hold up for you.  It's traditionally lucky if it rains on your wedding day anyways!  Making the decision to get married out of the rain was a smart move for you and your guests.  Just enjoy the day.  In fact, rainy day weather makes for some of the most spectacular wedding photos I've ever seen. 
Of course, everyone wants perfect weather on their wedding day!  But we don't control the weather and neither do you.  So just be prepared.  All outdoor weddings should make a rain plan.  It relieves your stress and keeps everyone dry!  Happy planning!

Guests sitting in the rain, waiting on the bride to walk down the aisle
Rainy Day Wedding

Guests quickly springing into action and moving chairs under the cover of the reception tent.
Herding Cats.  There's me, on the right, pink blazer, carrying chairs!

The bride is still walking down the aisle, despite the "rain plan" in effect
This bride was so chill about the weather.  Loved working with her!

Photos Courtesy of Cake Knife Photography

Thursday, April 9, 2015

HOW TO: Make your buffet display awesome

I spent years as a Director of Catering, and I CRINGE when I see a buffet display that's boring.  It only takes a small effort to make a buffet amazing, and it DOES make a difference!  Think about your wedding.  It doesn't matter what your budget might be for the wedding - you always cares about what the food tastes like!  And what's your first impression of the food, besides smell?  How it looks!  There's a saying "you eat with your eyes."  I'm here to tell you that it's true!  So let me share a few trade secrets to building a killer buffet display.

Also, while collecting materials to make your buffet awesome, remember how many buffets you're going to have!  We recommend one double sided buffet per 100 guests.  So make sure to get enough decor to cover them all.  And as always, get 3x the amount of decor you THINK you need.  It's better to have too much than not enough (as usually "enough" for a first timer isn't enough!)

#1:  The Hidden Height method.
Bring sturdy cardboard boxes, empty milk crates or dish crates.  All of these things can be hidden underneath linens.   Consider cool display "trays" when using this method.  The first image below shows the basic setup, before linens are added, and the second shows the finished product, using granite display trays.
Using dish crates and racks to create height

Staggering boxes underneath a buffet and adding levels


#2:  The Visible Height Method.
Basically, height and staggering is the basis to building a stunning buffet.  But you don't have to hide the layers.  Consider using crates, or great looking boxes to add that height.  Plates and platters which provide dimension are also great!  Get creative, and use this to carry on your wedding theme!  Vintage?  Use old suitcases.  Rustic?  Use old milk crates, etc.

Using wooden boards to display food

Using butcher block displays to show food


Staggering heights on a buffet using fresh produce

Using drawers to create a staggered effect

#3:  Label Your Food!
But don't do boring labels.  Paper is CHEAP.  Use it to your advantage, and theme it to match your invitations.  Or use another creative method.  Chalkboards are really popular this year, or make a big sign at the beginning of the buffet!

Creating paper labels in the same fonts as your other wedding paper products

Chalkboards as food labels

Using cheese boards or bread cutting boards as food labels on tables

Using large wooden boards to create food labels at the end of the buffet


#4:  Do NOT Set Up a Large Table!
The biggest mistake people make is not maximizing the space you have!  That's what staggering does.  You want to make sure all your chaffing dishes fit on the table, but at the same time, you don't want extra space.  If you're going for a minimalistic design, use beautiful, clean chaffers, and make sure they're stacked closely (as in the first picture).  But that can also go terribly wrong if the tables are too long or wide.  The bottom two pictures are what NOT to do:  


Keeping chaffing dishes close to maximize the space on a table

Spreads out the display and does not look appealing

Again, the space is too stretched out and does not show the food well.


 #5:  Have an Accent Piece.
One stunning piece of decor makes decorating much simpler!  Consider using a bookshelf with nooks, or a dresser, or a funky display!  Get creative!

This custom made metal ring holds display shelves for food

This bookshelf is perfect for displaying desserts

The backdrop and the custom cake stand are great accent pieces on this buffet


#6:  No Gaps.
If you stagger your display well, and the food platters look stunning, you won't have gaps.  But if this is your first time designing your own buffet, BUY FILLER.  Flowers are not good for filler because of allergens, and most are not edible.  We suggest purchasing produce from a local farmers market to add as filler.  Find produce that will keep, and clean it before using (just in case guests eat it!).  If your wedding is local, you can take it home with you after the wedding and eat it!  Such a simple way to add a "farm fresh" touch to your buffet.  Otherwise, consider adding other decor pieces such as canning jars, baguettes of bread, etc.

Use produce as filler on your buffet

Again, use produce to fill any visual "holes" in your display

The Chef should be able to fill the space ON the displays themselves - you should only be responsible for filling the rest of the table.